Sprintforms User Guide
Hello! Welcome to the Sprintforms Documentation and Guide. In this space, you'll find all you need to Get Started, answer your Frequently Asked Questions, and also find ways to Contact Us if you're still stuck.
- Sprintforms Documentation
- User Guide
- Getting Started
- Intake & Questionnaire Workflow
- Form Workflow
- Editing a Client's Questionnaire or Form
- Working in a Firm
- FAQ
- Contact Us
- Sprintforms Glossary
Sprintforms Documentation
Welcome to the Sprintforms Documentation!Here you'll find a collection of resources to guide you & your clients through using our patform. |
 |
Resources for Practitioners: |
Resources for Your Clients: |
User Guide
Learn how to use Sprintforms
Getting Started
Before You Begin
First, welcome to Sprintforms! We're glad to have you on board.
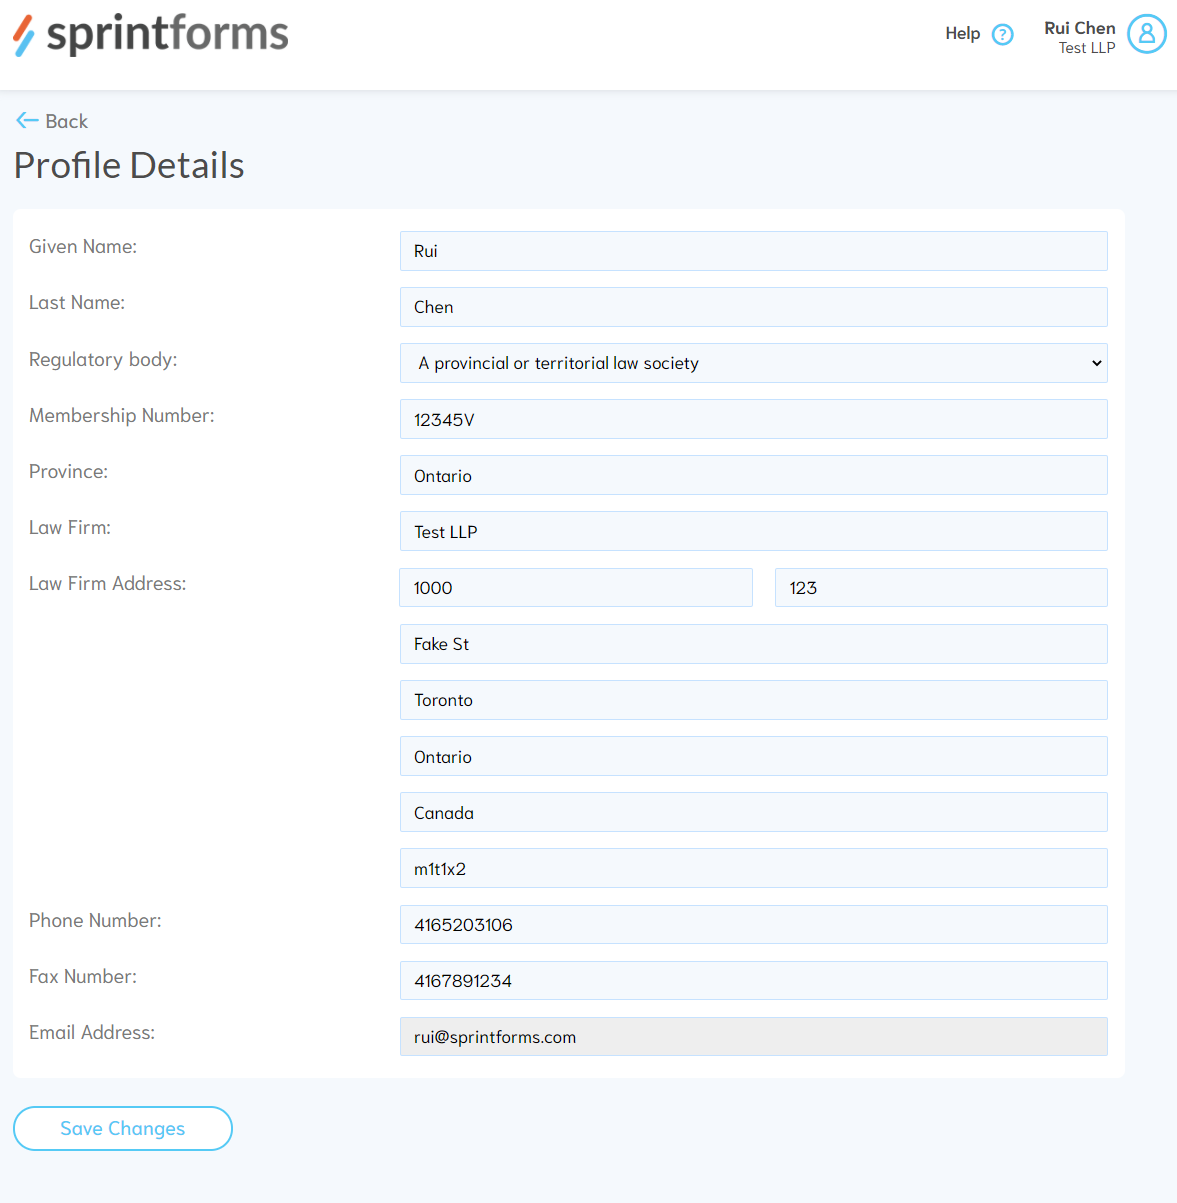
To get the most out of our platform, and before you start working on client files, please take a moment to fill in your personal and firm profile. This will allow Use of Representative forms to autopopulate with your professional information.
Personal Profile
In the top right menu, select "View Profile".
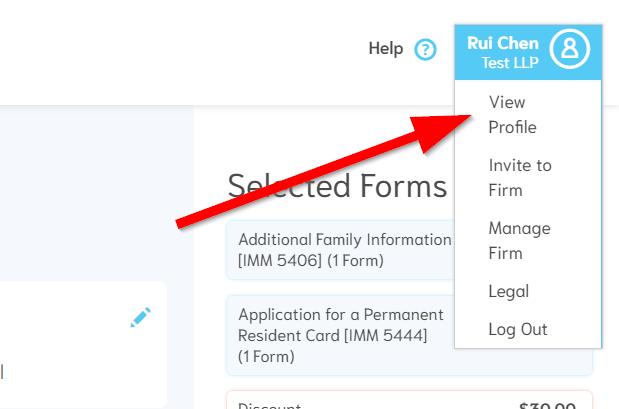
Fill in your information, then press "Save Changes".
Firm Profile
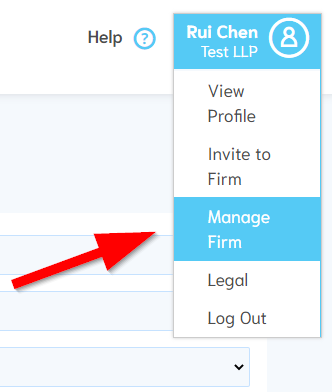
In the top right menu, select "Manage Profile".
Fill in your firm's information, then press "Save Changes".

Choosing Your Workflow
After filling in your profile, you're ready to begin using Sprintforms!
Sprintforms supports two types of immigration case workflows, those that use intake form/questionnaires, and those who prefer to send immigration forms directly. To get started, choose the workflow that best describes your style of practice:
- I send questionnaires to clients and then transfer the information onto the appropriate immigration forms
- I send immigration forms to clients directly
Intake & Questionnaire Workflow
To get started with your intake & questionnaire workflow, you first have to create an intake or questionnaire. Currently, Sprintforms has the following available:
Note: You may also have custom questionnaires available only to your firm on specific plans.
To create a questionnaire and send it to your client, follow these steps:
Step 1: Choose your questionnaire
Check the box next to the questionnaire you'd like to create.

Note: To get the best results on your resulting forms, we recommend using the questionnaire that matches the application type you will ultimately use the information on (e.g. if your client is doing a work permit outside Canada application, we recommend using the work permit questionnaire for outside Canada.
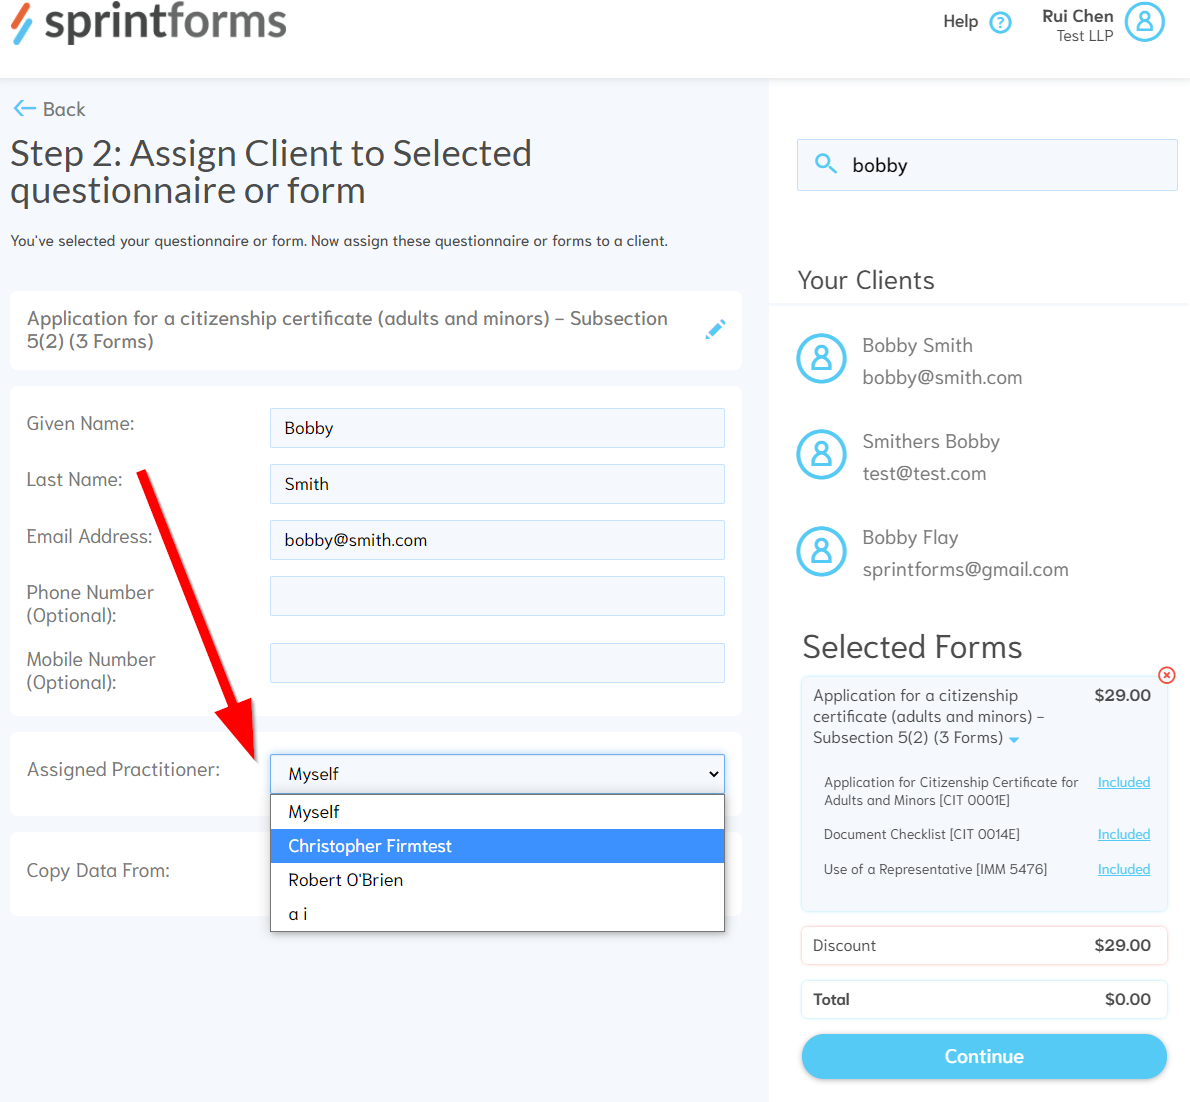
Step 2: Assign your client
Now that you've chosen your questionnaire, assign the client that this questionnaire belongs to.
For this example, we've assigned our questionnaire to "Test Client", and have left "assigned practitioner" to myself.

Step 3: Review Your Selection
The last step is to review your selections and your order details. You may be asked to provide payment details on this screen if you do not have a saved credit card and/or are not on a monthly plan.
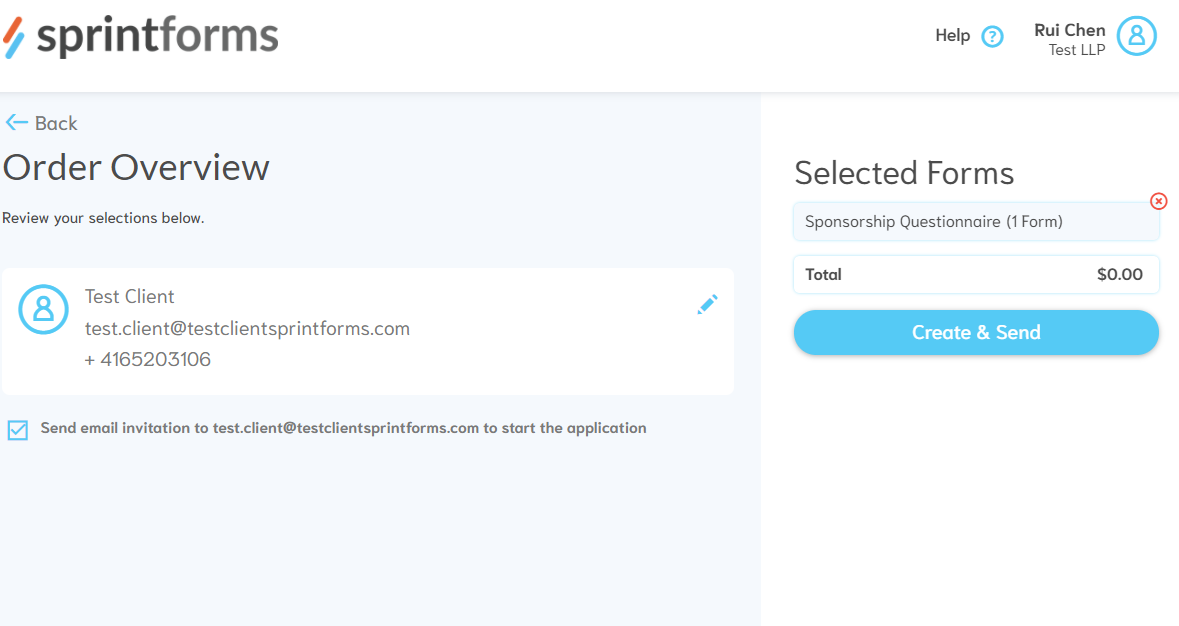
Note: You can also choose not to notify your client of the creation of this intake/questionnaire form, if you'd like to edit the application yourself. You can choose to notify them at a later date via the client information screen.
Once you press "Create & Send" your intake form has been successfully created! You can view the intake form right away, or return to the dashboard.

Form Workflow
Form workflows are ideal for clients that are comfortable around forms, or for clients that you may already have a questionnaire previously completed.
To create a form, follow these steps:
Step 1: Choose your application bundle or individual forms.
Sprintforms supports the majority of Canadian immigration forms. For convenience, many of these forms are pre-bundled together to form an "application bundle". Click on any bundle to reveal their contents:
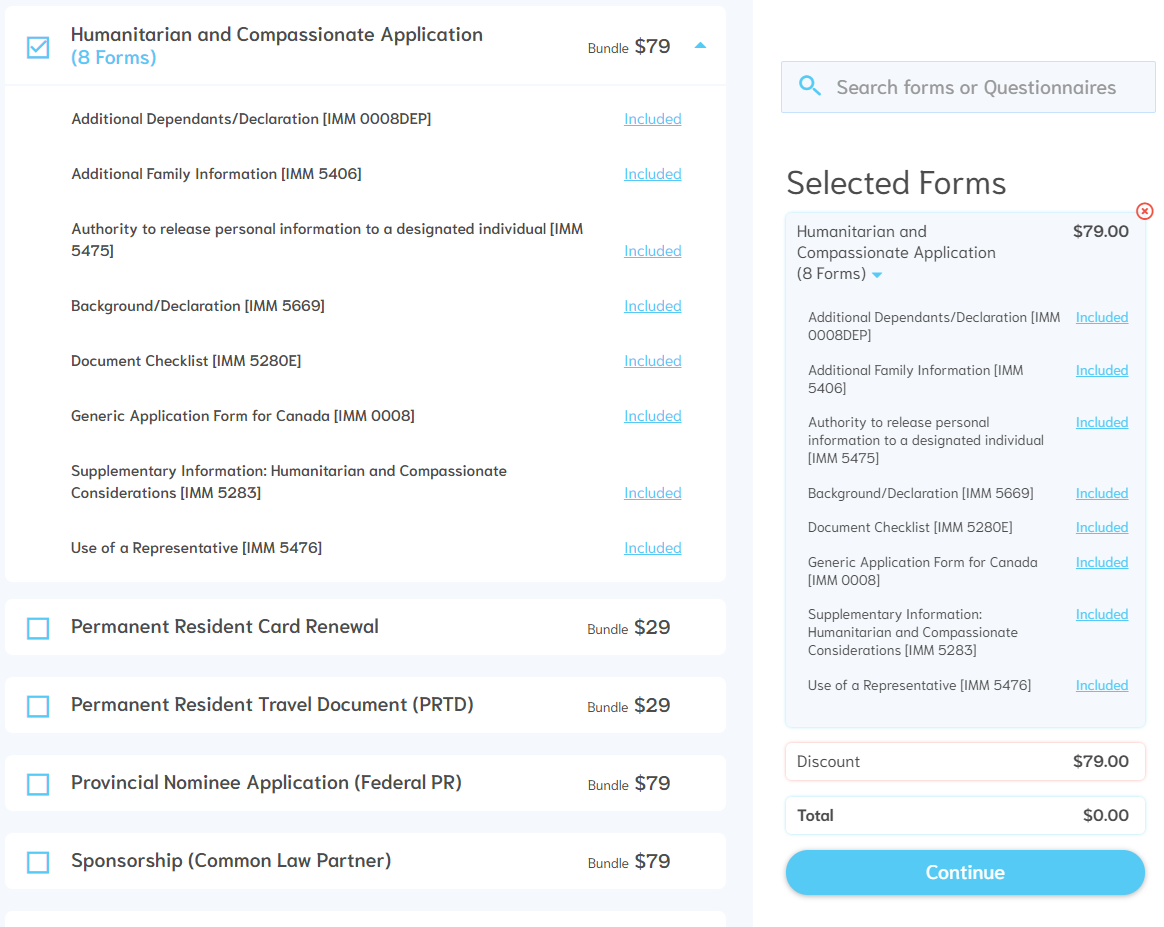
Note: You can click on the "Included" link to exclude a specific form if you don't want it from your bundle.
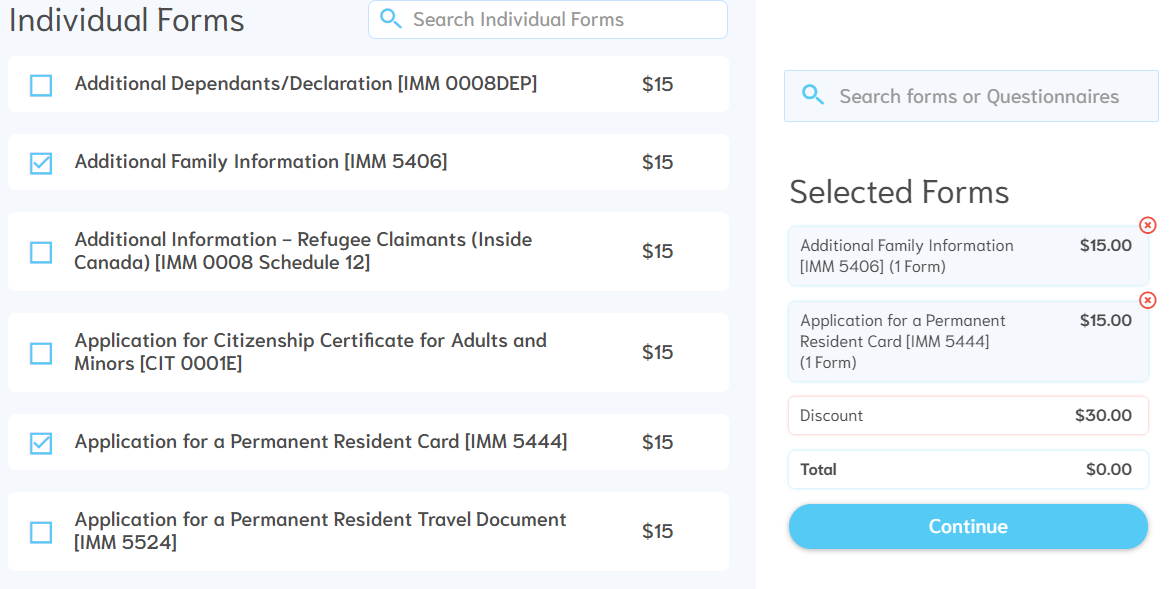
You may also choose individual forms, in situations where you may only require one or two forms. In this example, we've selected only the Family Information Form and the PR Card Renewal Forms:
Step 2: Assign your client, and select form creation options
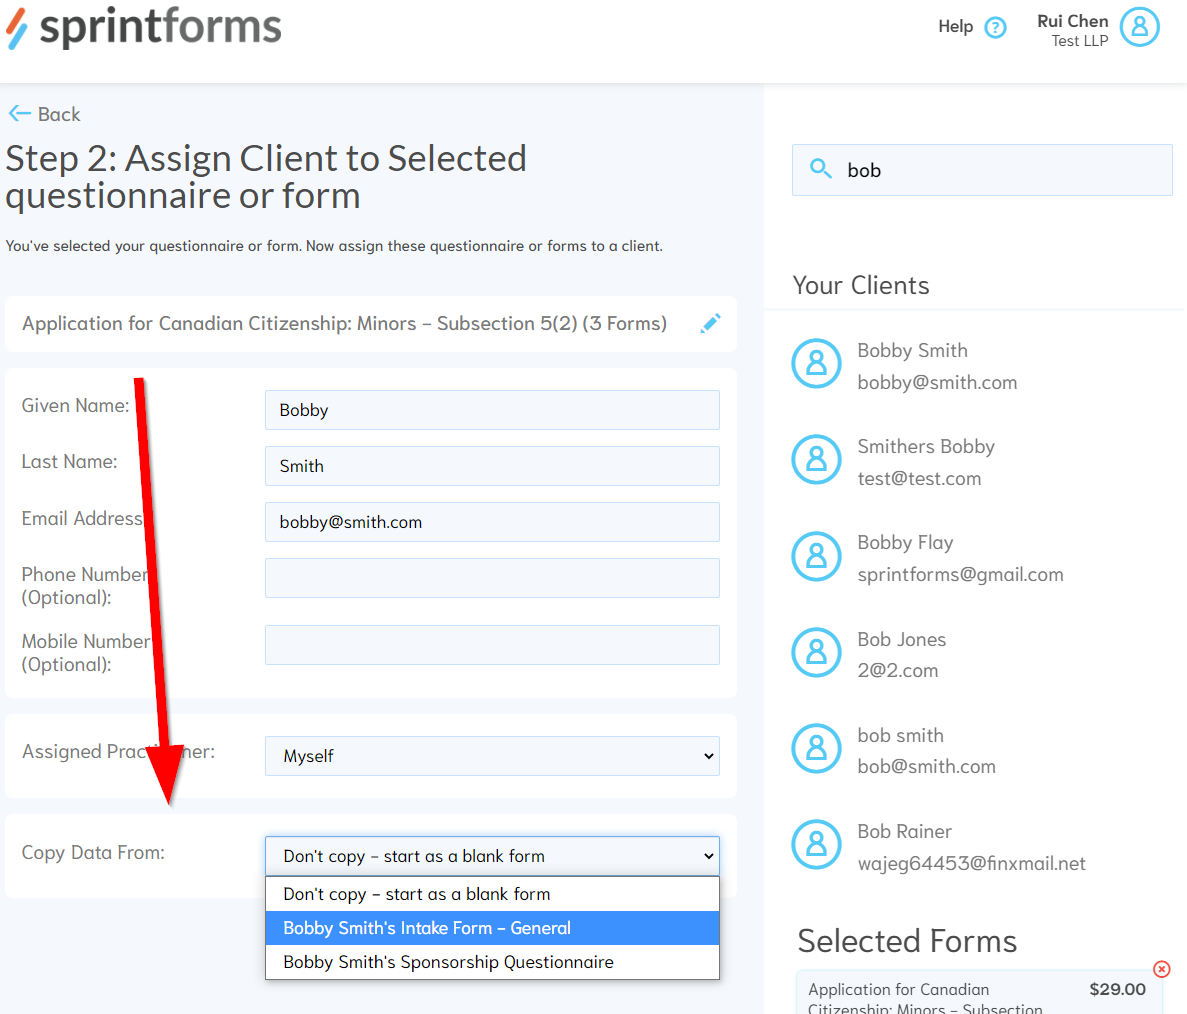
Now that you've chosen your application bundle or individual forms, assign the client that these forms belong to. You can also select options about these forms, including copying information from pre-filled questionnaires, and/or assigning work to other practitioners.
In the following example, we've assigned the selected forms from the last screen to an existing client named "Bobby Smith", and have chosen to Copy Data from Bobby's previous questionnaire. The assigned practitioner has been left to the account holder:
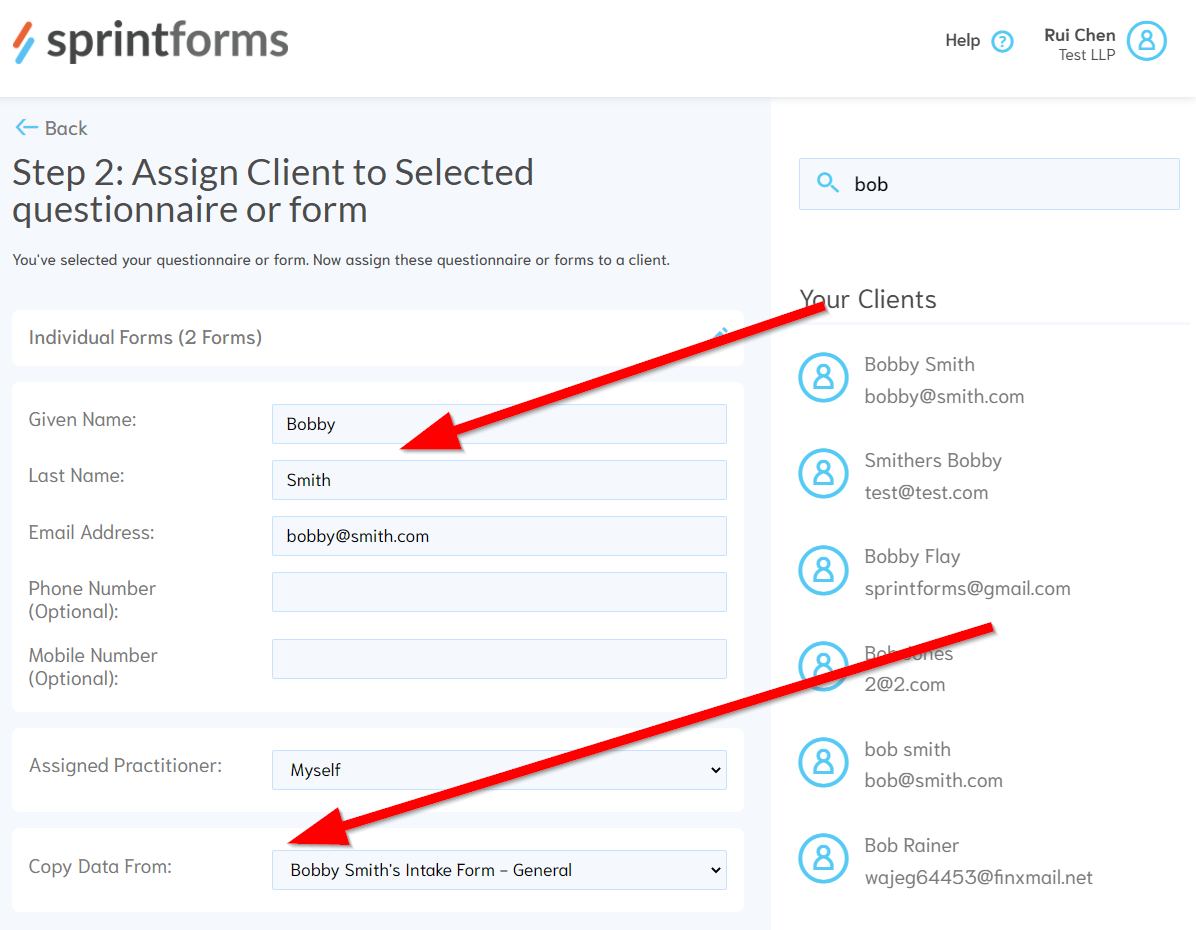
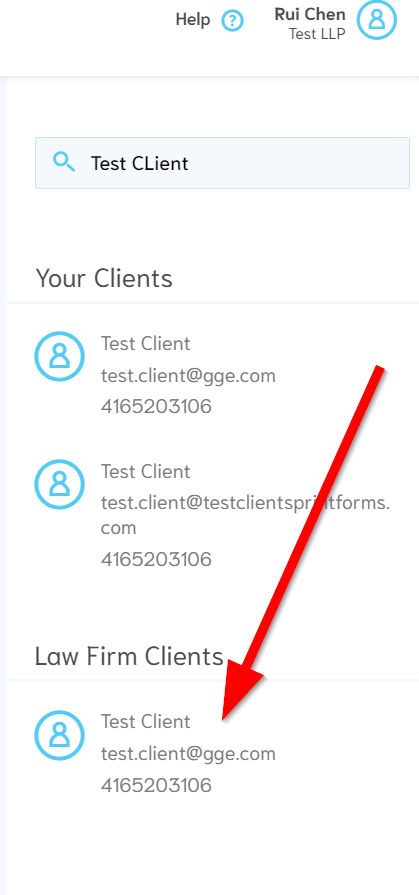
Note: If you don't see the "Copy Data From" selection, make sure you've assigned the forms to a client that has previously completed a questionnaire. Clients who are known to Sprintforms will appear on the right box under - you can click on their names/emails to ensure that you're selecting the right client.
Step 3: Review Your Selection
The last step is to review your selections and your order details. You may be asked to provide payment details on this screen if you do not have a saved credit card and/or are not on a monthly plan.
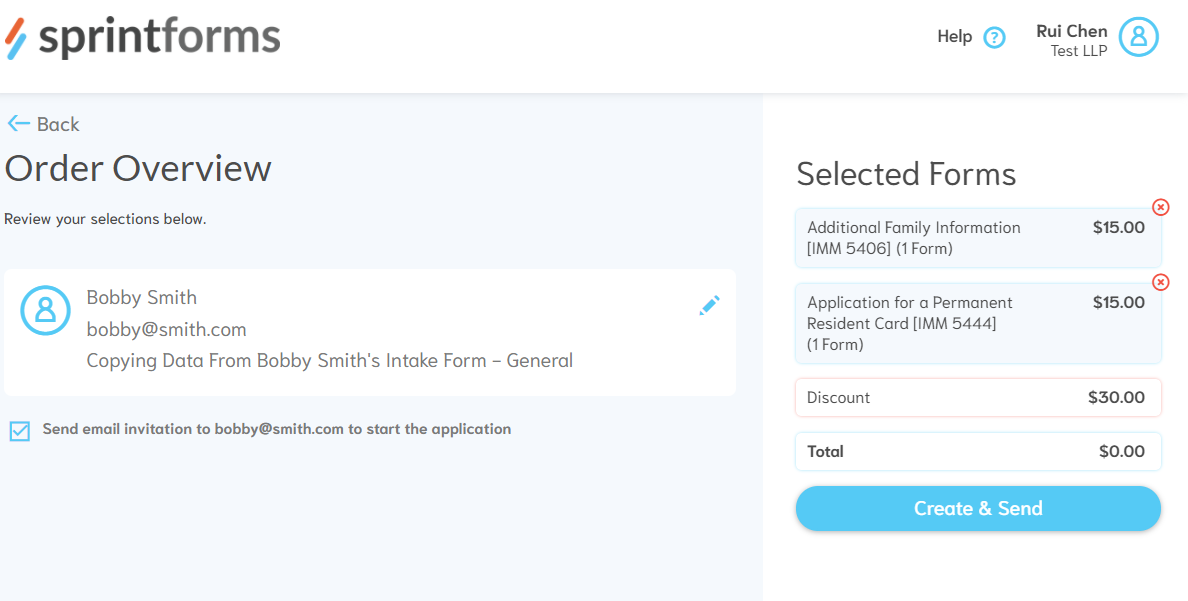
Note: You can also choose not to notify your client of the creation of this form (bundle), if you'd like to edit the application yourself. You can choose to notify them at a later date via the client information screen.
Once you press "Create & Send" your intake form has been successfully created! You can view the intake form right away, or return to the dashboard.
Editing a Client's Questionnaire or Form
At any time, you may view your client's assigned questionnaire or form. You can do this by clicking on client's name application under "Recent Applications", or through a specific search.


Note: Any changes you make to their questionnaire, or form, will be saved and instantly reflected for your client's form or questionnaire. There's no difference between what you see on your screen and what the client will see on theirs.
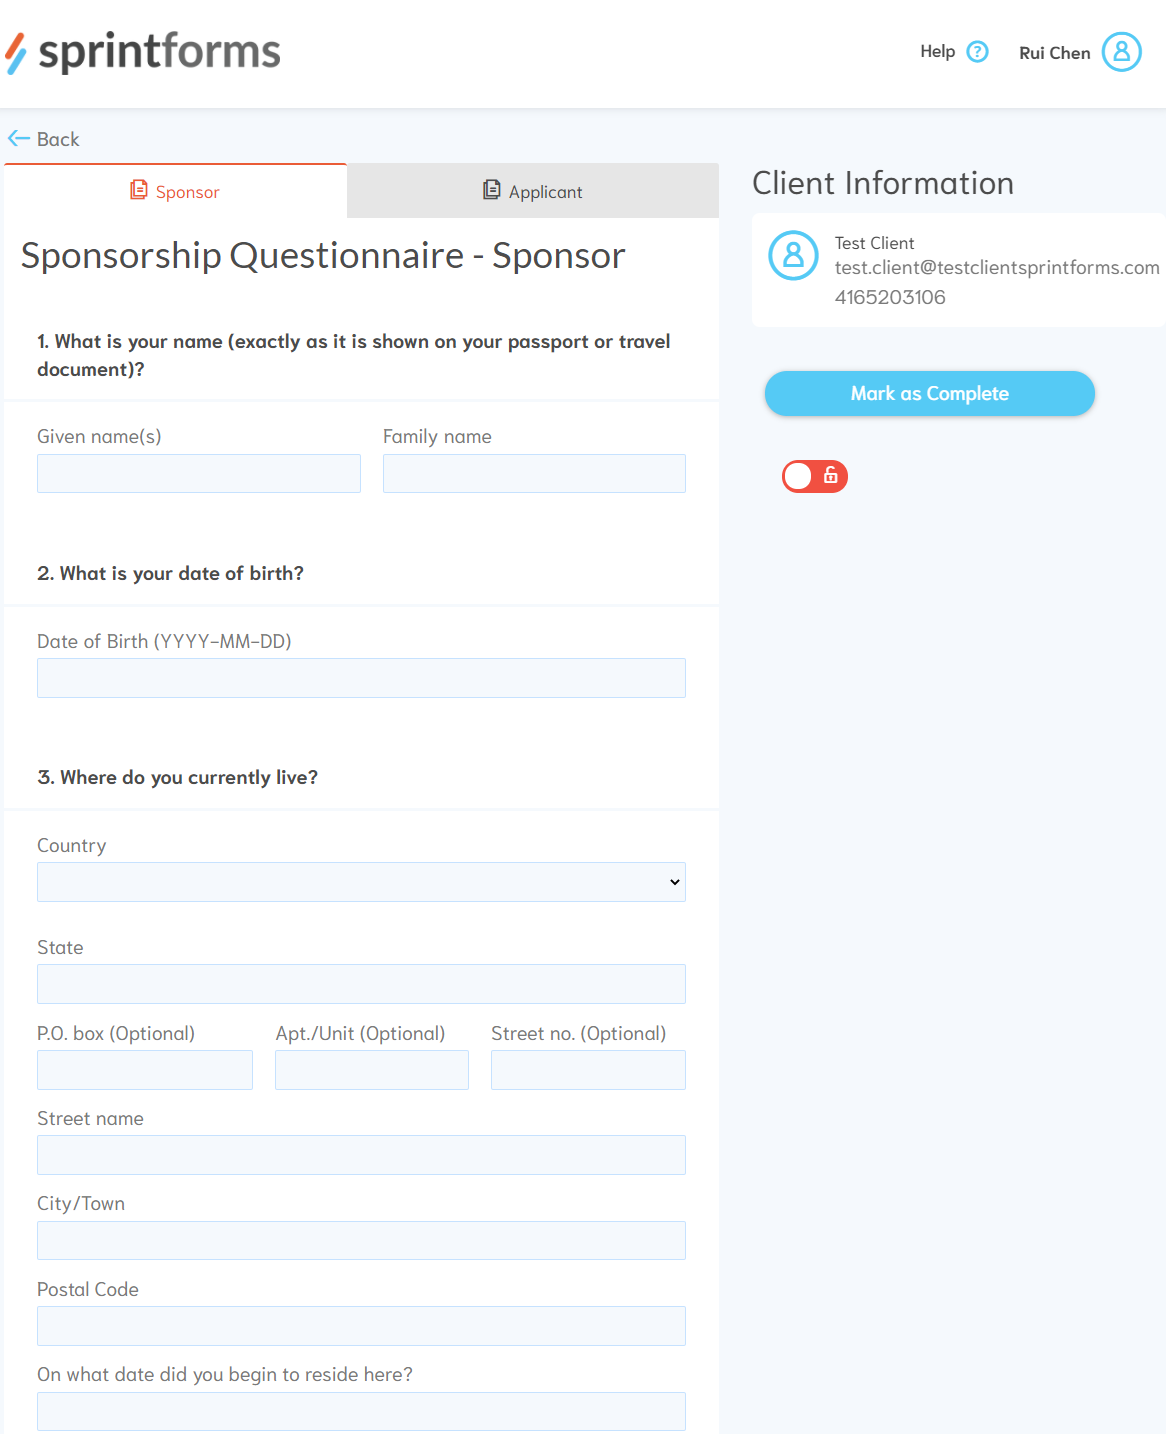
Working on Forms
Forms will look the same as the immigration forms that you are familiar with. You are able to edit information directly onto these forms without using a PDF reader (like Adobe Acrobat).


Once you are done editing the forms, you can download the PDF and finalize the application following your regular procedure:
Barcoded Forms
While we support editing barcoded forms directly on Sprintforms, we do not support generating the barcode in Sprintforms itself. To generate the barcodes, simply download the PDF from Sprintforms and then generate the barcode using Adobe Acrobat Reader or similar PDF software.
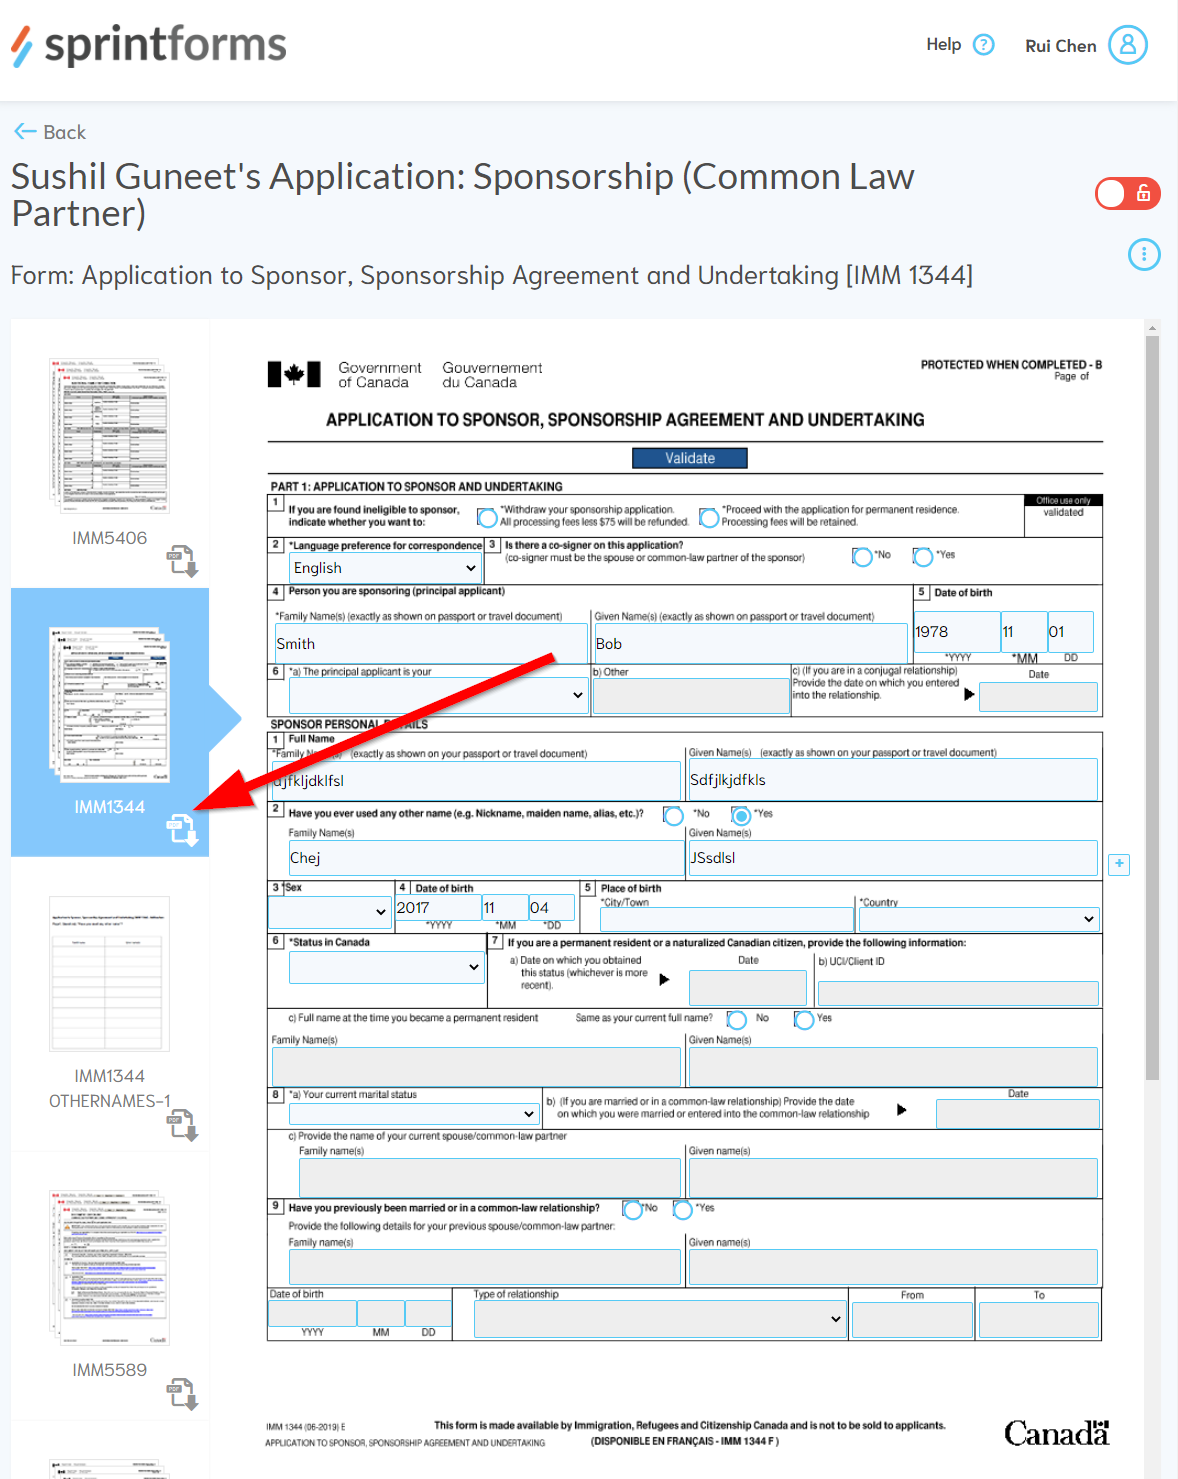
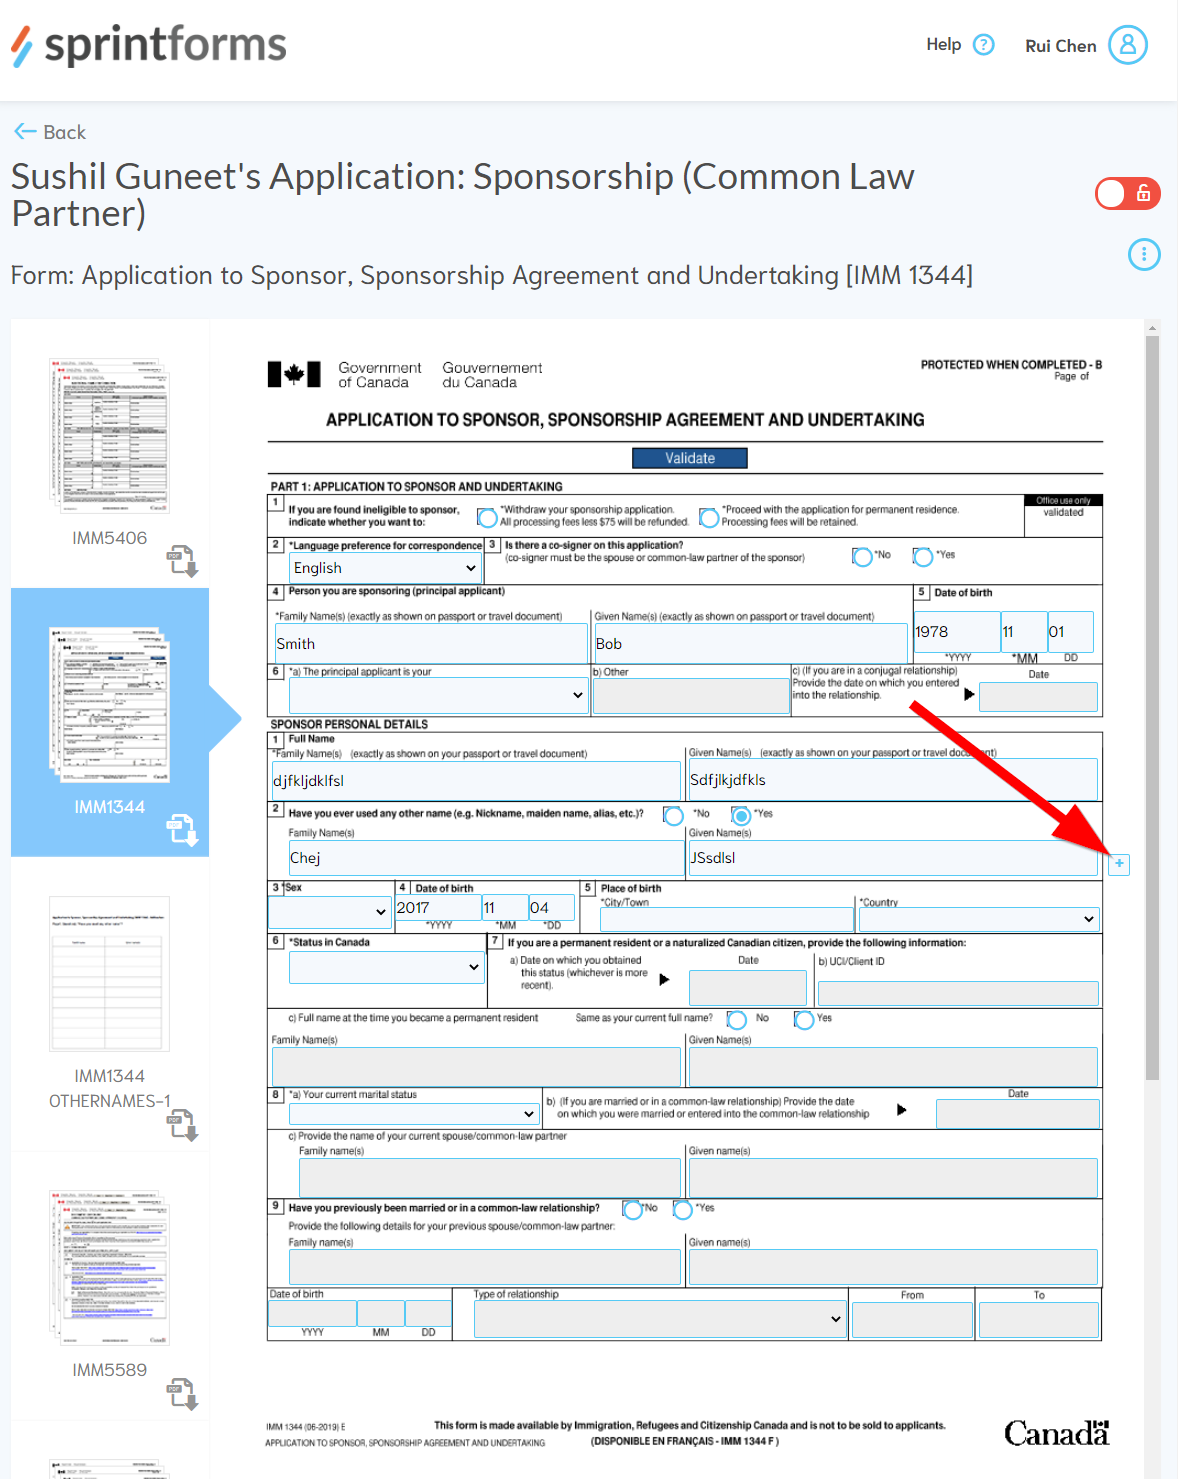
Form Addendums
We've added some quality of life addition to your form editing experience. In certain areas, we've placed a "+" button that will add an additional sheet for additional rows of information. These additional sheets will download as a PDF that can be printed and/or sent to a client.

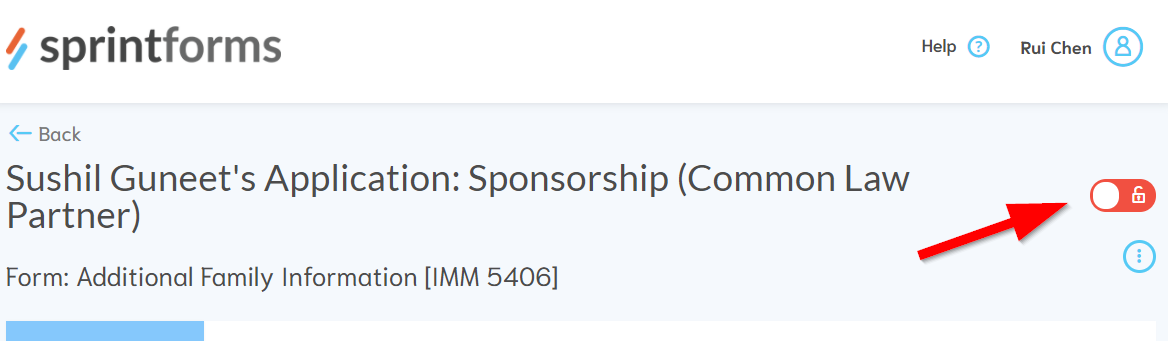
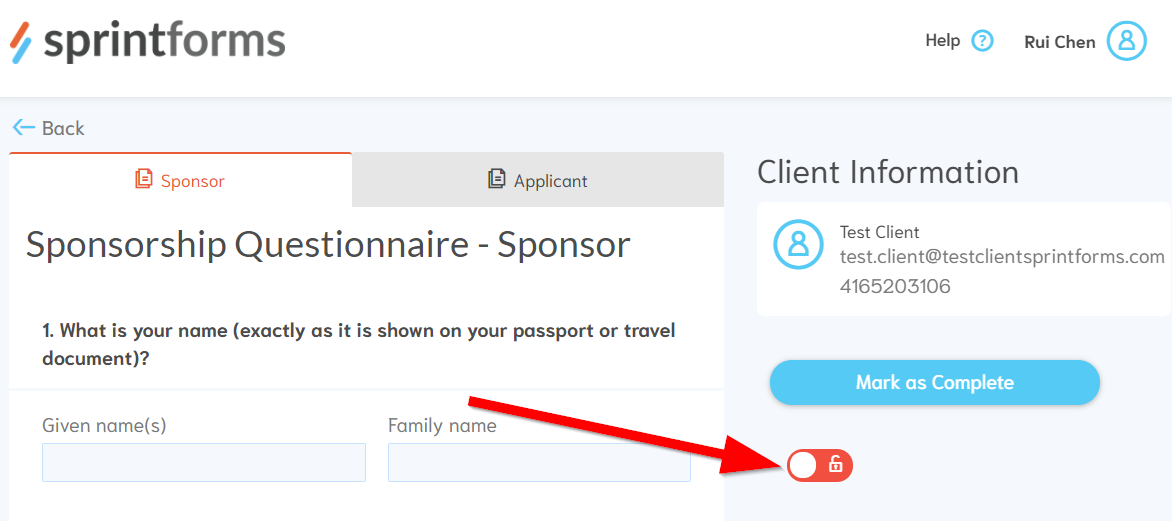
Locking Behaviour
When you enter a client's questionnaire or form to edit, your clients are automatically locked out to prevent changes from being overwritten by your clients. Your clients will be allowed to resume editing once you have exited the form's editing view.
Set Lock State Manually
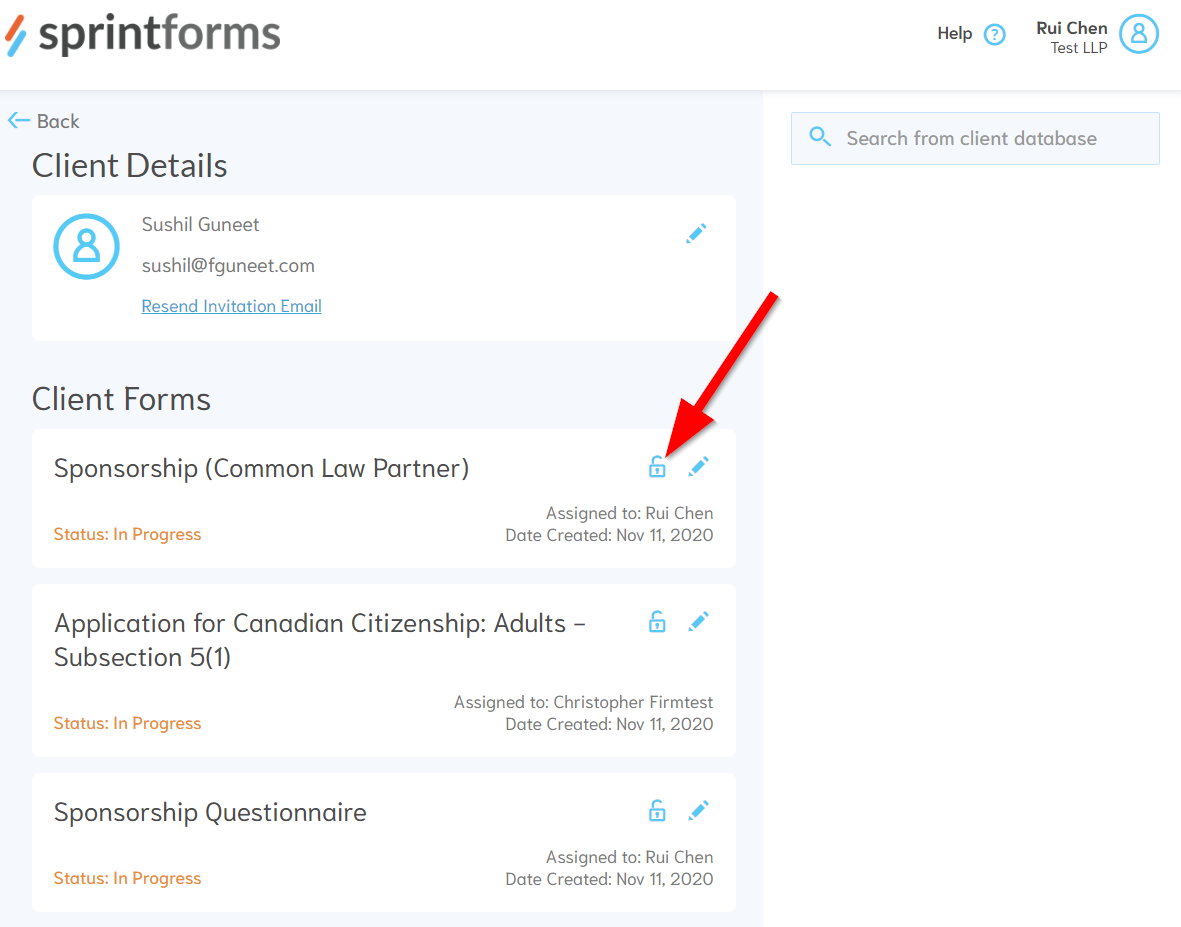
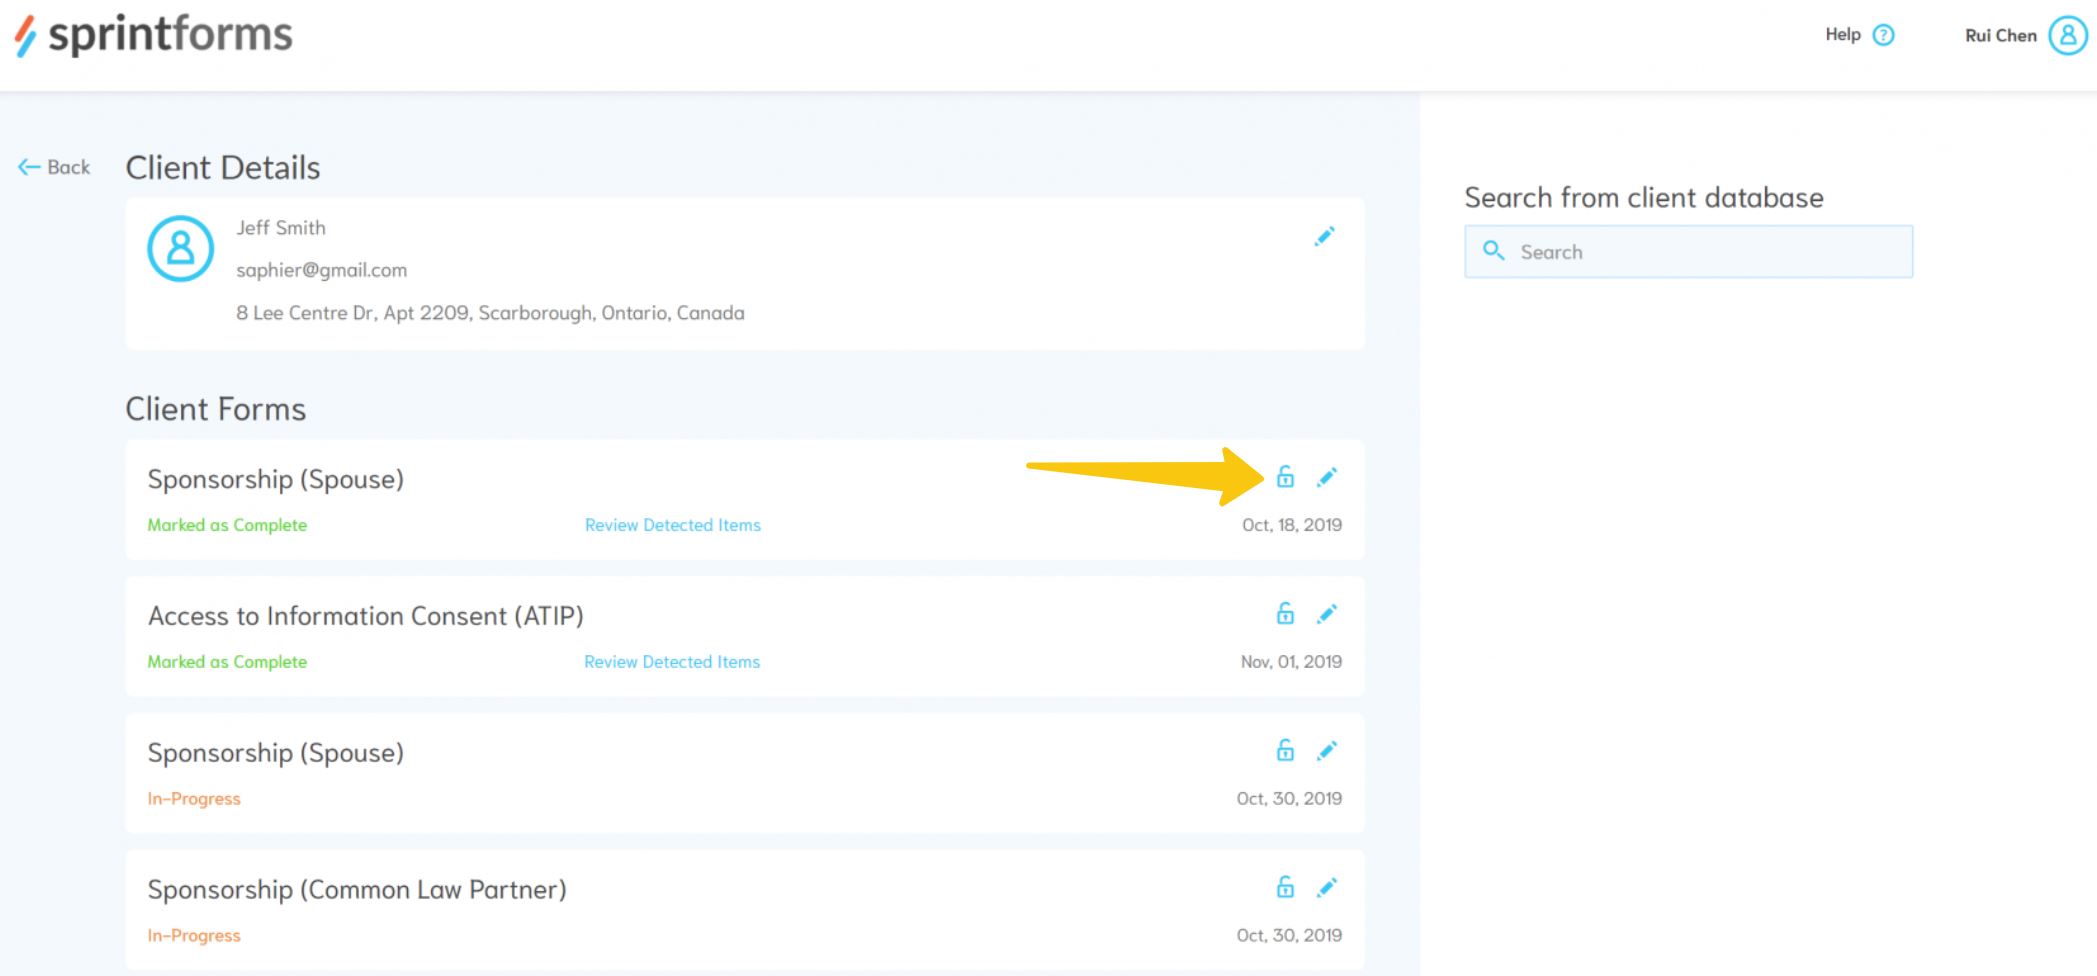
You can also set the locked state of your forms or questionnaires manually. There is a pad lock icon that is present on each application and questionnaire.
This will allow you to toggle between two states:
Locked
- Your clients will be able to view, but not edit the application
Unlocked
- Your clients will be able to view, but not edit the application any time you (or your firm members) are working on the application.
- Your clients will be able to edit the application when you are (or your firm members) are not working on the application.
Working in a Firm
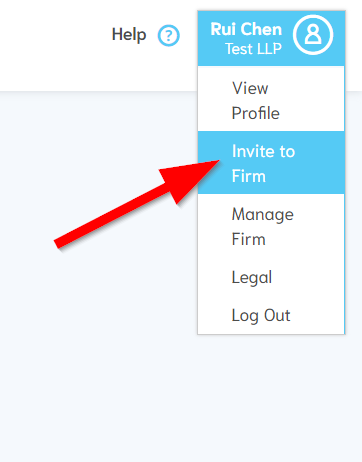
Sprintforms supports working collaboratively with members of your law firm. To get started, you can invite people to your firm by using the "Invite to Firm" menu item, and entering their emails in the pop up box that follows.
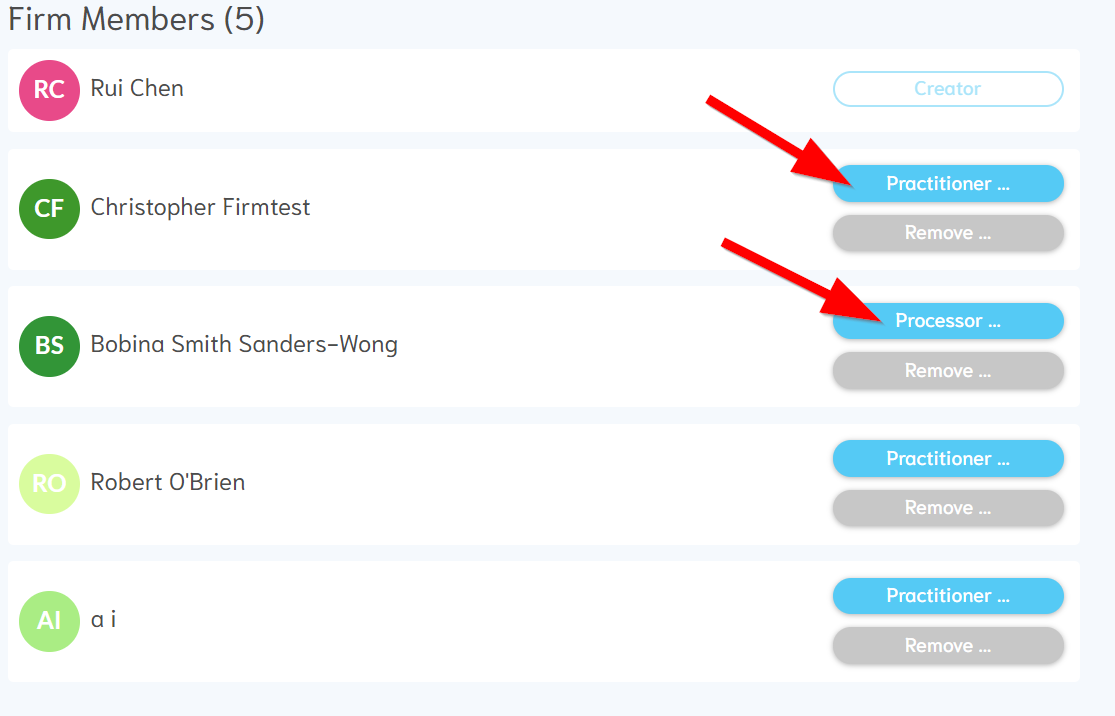
Firm Roles
Members of your firm can be assigned two different roles: "Practitioner" or "Processor".
Practitioners are individuals whose information will be available to pre-fill Use of Representative forms. Typically, these individuals who are both: 1) authorized to represent clients for consideration under Canadian immigration law, and 2) usually a signatory on the Use of Representative form.
Processors are individuals who may work on forms, but will never have their information be on the Use of Representative form. Generally, these are individuals who will work under the name of a lawyer, paralegal, or immigration consultant.
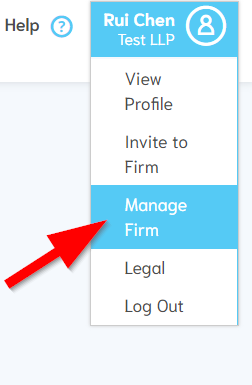
To choose your firm members' role, navigate to the "Manage Firm" page on the top right menu:
You'll then see a list of Firm Members who are part of your firm. You can click on the "Practitioner ..." or "Processor ..." button to change their role:
Assigning Files
Once you have members in your firm, you will be given an additional option when creating questionnaires or forms to assign these questionnaires or forms to a particular firm practitioner:
Assigning a specific practitioner will have their information prefilled on the form bundle's Use of Representative forms (if applicable). It also provides an easily accessible way for you to keep track of who is responsible for which client's file.
Firm Files
Sprintforms will allow for you to view, edit, and contribute to any of your firm members' forms/questionnaire. You can do so by searching for a specific client on the right hand side search bar:
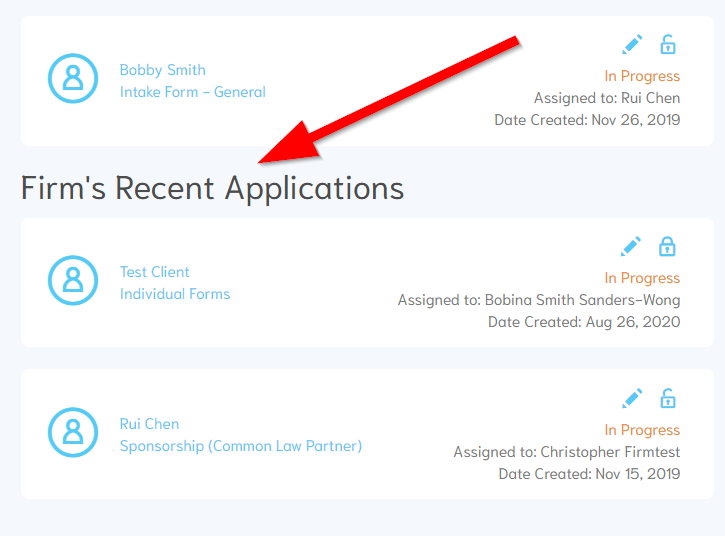
You will also find a list of your firm's most recently accessed files on the bottom of your "Recent Applications" list:
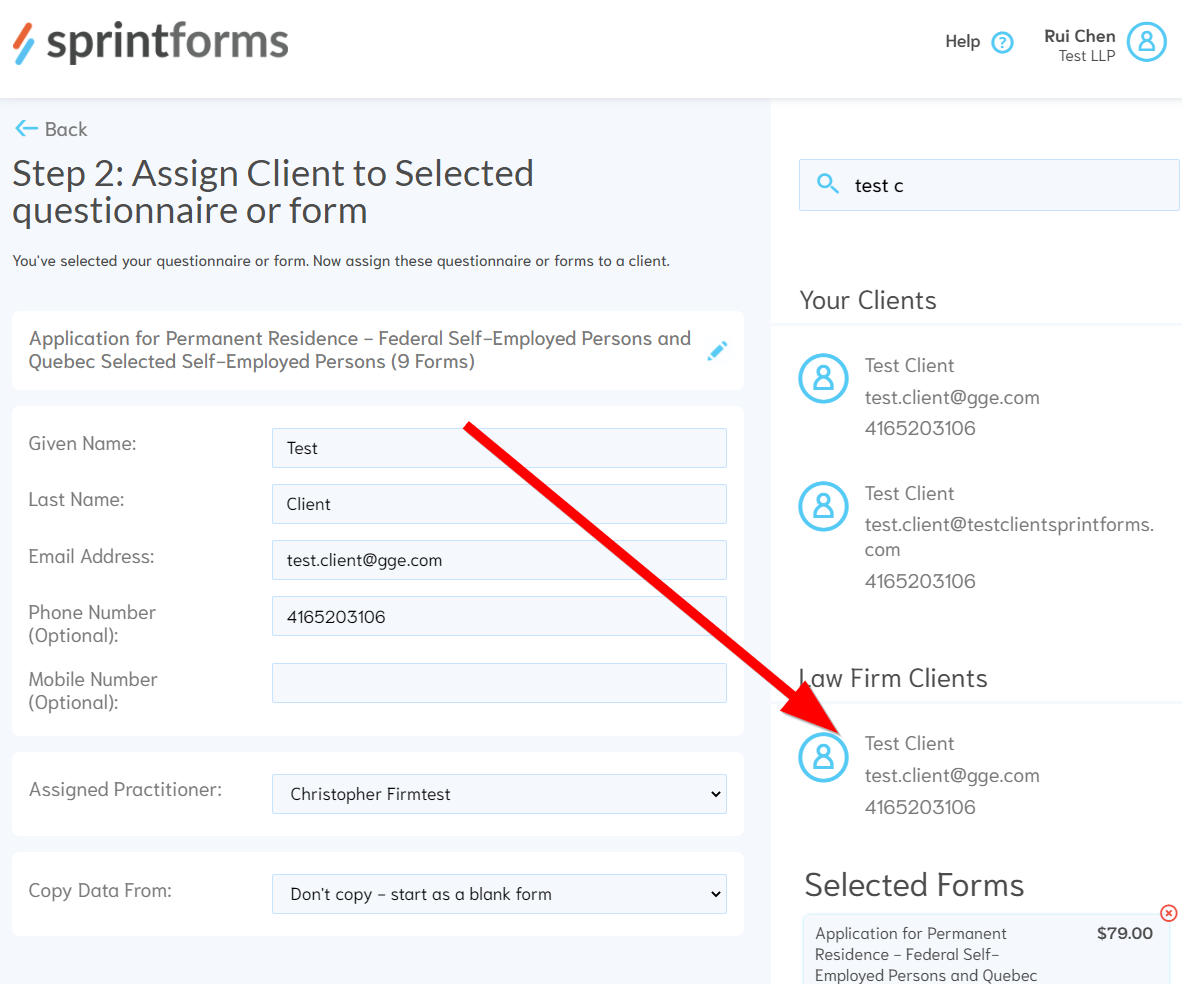
Lastly, you can even create applications/forms for your firm's clients, including using any of the client's previously prefilled questionnaires. In the example below, we've found our "Test Client" from the Law Firm Client section of the search bar, and are in the process of assigning them to a new Quebec application form to them. We've also assigned the practitioner of "Christopher Firmtest" as the assigned practitioner.
FAQ
How can I access information about a client?
Your individual client's information is conveniently stored in a location called the Client Dashboard.

The client dashboard contains all information about your client in one place, including their profile information (name, address, email, telephone number) and any associated applications assigned to the client. From the Client Dashboard you can quickly jump into any of the client's applications, edit information associated with your client, review completed application's reports, and lock/unlock applications.
To access the Client Dashboard, simply search for the client from your Practitioner Dashboard and click on the results.

Help! My client says their application is locked. How do I unlock their application?
The easiest way is to navigate to the Client's Dashboard by searching their name in your Practitioner Dashboard.
Once you are on the dashboard, locate the application they are working on and click on the lock/unlock icon on any specific application.
Viola! Your client's application is unlocked, and they can resume editing it.
Contact Us
Stuck? No problem - give us a shout:
Call us:
1-833-331-6505 (Available Monday to Friday, 10 am to 5 pm EST)
Email us:
Sprintforms Glossary
This chapter describes the various pages and features you may encounter in using our tool.
Questionnaire and Intake Forms
Sprintforms supports collecting information in a format that is more accessible and friendlier than immigration forms.
Here is an example of what the spousal sponsorship questionnaire looks like:
Currently, Sprintforms has the following available:
Questionnaire Coverage
Questionnaires aim to get a majority of the information from your clients, but they are not 1-to-1 replicas of the questions found on the immigration forms. Our out of the box questionnaires will give you a good head start on the forms, especially if you match the questionnaire type with the application type (e.g. spousal sponsorship questionnaire will work best for spousal sponsorship applications), but it will not be a complete application.
In other words: even if a client has finished a questionnaire, you'll still have to fill in missing information on the immigration application form itself. Keep that in mind as you use questionnaires.
Copying Information From Questionnaires to Forms
Once a questionnaire is created and assigned to a individual, the information contained with in it is immediately available to "copy" from the questionnaires on to the forms.
When you create an application bundle, or form, you will have a choice to select which the source questionnaire, from which information from that will be copied into the most appropriate spots on the destination form.
Note: You can choose to copy information from any questionnaire to any form, but results will vary. For example, you may choose to copy information found on a client's "spousal sponsorship questionnaire" to a work permit form, but the resulting form will not be as filled in as fulsomely as if you used the work permit questionnaire as a source.
Practitioner Dashboard

The Practitioner's Dashboard is your home base for Sprintforms. From the dashboard, you can:
-
- Create and invite clients to new immigration application.
- Quickly jump into recent applications.
- Find clients registered with Sprintforms and access their Dashboard.
Clicking on the top left Sprintforms logo from any page will let you go home to your dashboard.
Client Dashboard
The Client Dashboard allows you to quickly glance at all relevant information Sprintforms has about your client, including:
-
- Your client's name
- Email address
- Address
- Telephone number
- Assigned application(s)
- Applications' locked or unlocked status
- Applications' progression
From the client dashboard, you can jump directly into the client's associated Application, or their application's Report, if the application has been Marked as Complete.
You can quickly access the Client Dashboard by searching for and clicking on your client's name in your Practitioner Dashboard. You can also access it by clicking on your client's name in their application.